微信小程序开发之——录音播放及文件上传下载-示例(2)

一 概述

  • 开始播放和暂停播放按钮,演示音频的播放和暂停功能
  • 开始播放时,先下载服务器上的文件(1.mp3),然后进行播放
  • 录音、停止、回放按钮,演示录音API的相关功能
  • 上传按钮将录音文件上传到后台htdocs文件夹下

二 后台服务器的开启

2.1 后台服务器说明

说明:

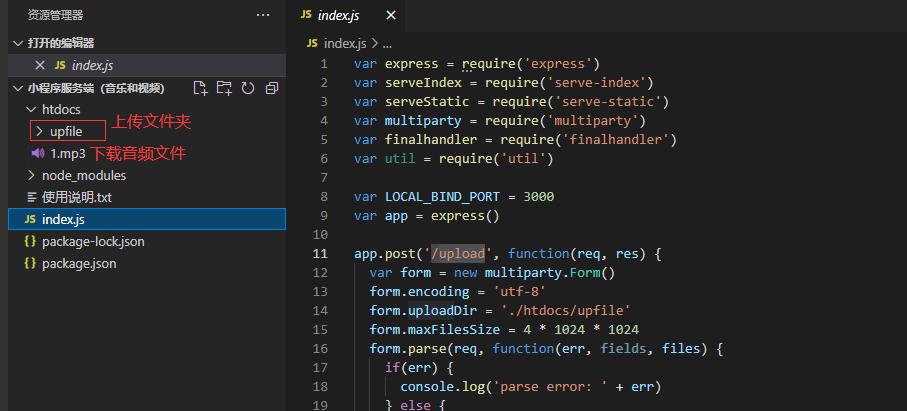
  • upfile:点击上传按钮后,将文件上传到此文件夹下
  • 1.mp3:点击开始播放,下载1.mp3文件,然后播放

2.2 启动服务器

1
node index.js

三 小程序示例

3.1 布局文件(index.wxml)

1
2
3
4
5
6
7
8
9
10
11
12
13
14
15
16
17
18
19
<view class="btn-rows">
<button class="btn" bindtap="play" size="mini">开始播放</button>
<button class="btn" bindtap="pause" size="mini">暂停播放</button>
</view>

<view class="song">
此处放置要播放的内容 此处放置要播放的内容 此处放置要播放的内容
</view>

<view class="btn-rows">
<!-- 录音record()函数 -->
<button class="btn" bindtap="record" size="mini">录音</button>
<!-- 停止stop()函数 -->
<button class="btn" bindtap="stop" size="mini">停止</button>
<!-- 回放playback()函数 -->
<button class="btn" bindtap="playback" size="mini">回放</button>
<!-- 上传upload()函数 -->
<button class="btn" bindtap="upload" size="mini">上传</button>
</view>

3.2 样式文件(index.wxss)

1
2
3
4
5
6
7
8
9
10
11
12
13
14
15
16
17
18
page{
width: 100%;
padding: 0rpx 20rpx 10rpx 20rpx;
box-sizing: border-box;
}
.btn-rows{
display: flex;
flex-direction: row;
}
.song{
font-size: 32rpx;
margin: 10rpx;
}
.btn{
flex: 1;
margin: 5rpx;
background: #eeeeee;
}

3.3 逻辑文件(index.js)

1
2
3
4
5
6
7
8
9
10
11
12
13
14
15
16
17
18
19
20
21
22
23
24
25
26
27
28
29
30
31
32
33
34
35
36
37
38
39
40
41
42
43
44
45
46
47
48
49
50
51
52
53
54
55
56
57
58
59
60
61
62
63
64
65
66
67
68
69
70
71
72
73
74
75
76
//var tempFilePath = null 
var tempFilePath = '/res/1.mp3' //模拟时使用此地址
var audioCtx = wx.createInnerAudioContext()
var rec = wx.getRecorderManager()
rec.onStop(res => {
tempFilePath = res.tempFilePath
console.log('结束录音' + tempFilePath)
})

Page({
//开始录音
record: function () {
rec.start()
console.log('开始录音')
},
//停止录音
stop: function () {
rec.stop()
},
//回放录音
playback: function () {
audioCtx.src = tempFilePath
audioCtx.play()
},
//上传录音
upload: function () {
if (!tempFilePath) {
wx.showToast({
title: '还没有录音哦'
})
return
}
wx.uploadFile({
filePath: tempFilePath,
name: 'file',
url: 'http://localhost:3000/upload', //服务器地址
success: res => {
console.log('文件上传成功' + res)
},
fail: res => {
console.log('文件上传失败', res)
}
})
},
//播放文章
play: function () {
wx.showLoading({
title: '音频下载中',
})
//从服务器中,把音频下载到本地
wx.downloadFile({
url: 'http://localhost:3000/1.mp3', // 服务器资源地址
success: res => {
//下载完成,播放音频
console.log('开始播放')
audioCtx.src = res.tempFilePath
audioCtx.play()
wx.hideLoading()
},
fail: res => {
wx.hideLoading()
wx.showToast({
title: '出错了',
})
}
})
},
//暂停/继续播放
pause: function () {
if (audioCtx.pause) {
audioCtx.play()
} else {
audioCtx.pause()
}
}
})

说明:

  • 使用录音时,请使用真机,本文演示使用模拟器
  • 真机时,tempFilePath为null,本文演示使用固定路径/res/1.mp3(请确保有此文件)

3.4 效果图(点击上传,文件上传到upload文件夹)

四 参考代码

  • 参考代码