一 AndroidView说明
AndroidView是一个原生端自定义的View,继承自PlatformView
混合开发中,自定义后的AndroidView,可以在flutter端使用
AndroidView可以在原生端和Flutter之间传递数据
二 自定义AndroidView 2.1 原生项目添加FlutterModule settings.gradle 1 2 3 4 5 6 7 setBinding(new Binding([gradle: this])) evaluate(new File( settingsDir, 'flutter_module/.android/include_flutter.groovy' )) include ':flutter_module'
说明:flutter_module为Flutter模块的项目名称
app/build.gradle 1 implementation project(path: ':flutter')
2.2 自定义AndroidView 说明:
在app项目的java/包名目录下创建嵌入Flutter中的AndroidView
此View继承PlatformView,实现getView和dispose两个方法
getView :返回要嵌入 Flutter 层次结构的Android Viewdispose :释放此View时调用,此方法调用后 View 不可用,此方法需要清除所有对象引用,否则会造成内存泄漏。
1 2 3 4 5 6 7 8 9 class MyFlutterView(context: Context) : PlatformView { override fun getView(): View { TODO("Not yet implemented") } override fun dispose() { TODO("Not yet implemented") } }
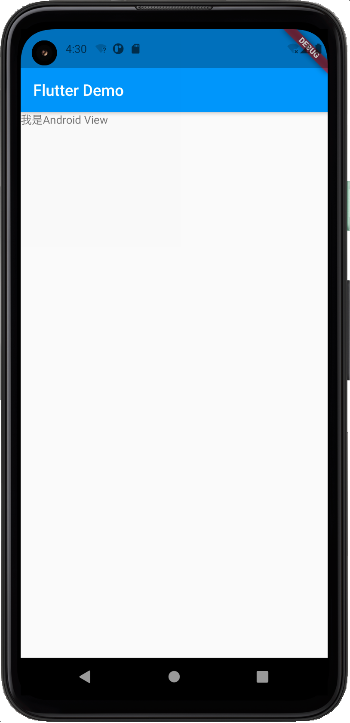
2.3 设置返回的View为TextView 1 2 3 4 5 6 7 8 9 10 11 12 13 14 15 16 class MyFlutterView(context: Context, messenger: BinaryMessenger, viewId: Int, args: Map<String, Any>?) : PlatformView { val textView: TextView = TextView(context) init { textView.text = "我是Android View" } override fun getView(): View { return textView } override fun dispose() { TODO("Not yet implemented") } }
说明:
messenger :用于消息传递,后面介绍 Flutter 与 原生通信时用到此参数viewId :View 生成时会分配一个唯一 IDargs :Flutter 传递的初始化参数
1
2
3
4
5
6
7
8
class MyFlutterViewFactory(val messenger: BinaryMessenger) : PlatformViewFactory(StandardMessageCodec.INSTANCE) { override fun create(context: Context, viewId: Int, args: Any?): PlatformView { val flutterView = MyFlutterView(context, messenger, viewId, args as Map<String, Any>?) return flutterView } }
创建MyPlugin 1 2 3 4 5 6 7 8 9 10 11 12 13 14 15 16 17 18 19 20 21 22 23 24 25 class MyPlugin : FlutterPlugin { override fun onAttachedToEngine(binding: FlutterPlugin.FlutterPluginBinding) { val messenger: BinaryMessenger = binding.binaryMessenger binding .platformViewRegistry .registerViewFactory( "plugins.flutter.io/custom_platform_view", MyFlutterViewFactory(messenger)) } companion object { @JvmStatic fun registerWith(registrar: PluginRegistry.Registrar) { registrar .platformViewRegistry() .registerViewFactory( "plugins.flutter.io/custom_platform_view", MyFlutterViewFactory(registrar.messenger())) } } override fun onDetachedFromEngine(binding: FlutterPlugin.FlutterPluginBinding) { } }
说明:
plugins.flutter.io/custom_platform_view ,这个字符串在 Flutter 中需要与其保持一致
2.5 在 App 中 MainActivity 中注册 1 2 3 4 5 6 class MainActivity : FlutterActivity() { override fun configureFlutterEngine(flutterEngine: FlutterEngine) { super.configureFlutterEngine(flutterEngine) flutterEngine.plugins.add(MyPlugin()) } }
2.6 嵌入Flutter 1 2 3 4 5 6 7 8 9 10 11 12 13 14 15 16 17 18 19 20 21 22 void main() => runApp(PlatformViewDemo()); class PlatformViewDemo extends StatelessWidget { @override Widget build(BuildContext context) { Widget? platformView(){ if(defaultTargetPlatform == TargetPlatform.android){ return AndroidView( viewType: 'plugins.flutter.io/custom_platform_view' ); } } return MaterialApp( home: Scaffold( appBar: AppBar(title: Text("Flutter Demo"),), body: Center( child: platformView(), ), ), ); } }
2.7 效果图
三 设置初始化参数 3.1 Flutter 端修改如下 1 2 3 4 5 AndroidView( viewType: 'plugins.flutter.io/custom_platform_view', creationParams: {'text': 'Flutter传给AndroidTextView的参数'}, creationParamsCodec: StandardMessageCodec(), )
说明:
creationParams :传递的参数,插件可以将此参数传递给 AndroidView 的构造函数creationParamsCodec :将 creationParams 编码后再发送给平台侧,它应该与传递给构造函数的编解码器匹配。值的范围:
StandardMessageCodec
JSONMessageCodec
StringCodec
BinaryCodec
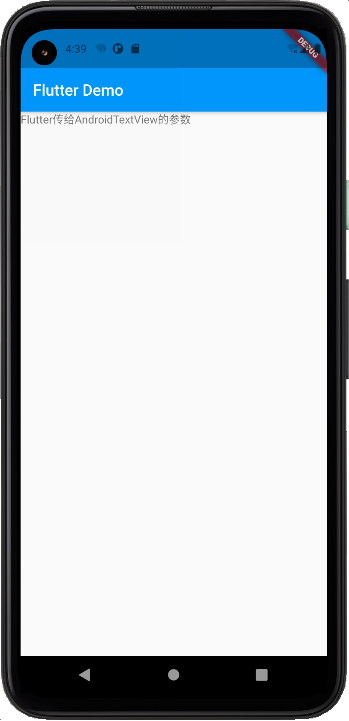
3.2 修改 MyFlutterView 1 2 3 4 5 6 7 8 9 10 11 12 13 14 15 16 17 18 19 class MyFlutterView(context: Context, messenger: BinaryMessenger, viewId: Int, args: Map<String, Any>?) : PlatformView { val textView: TextView = TextView(context) init { args?.also { textView.text = it["text"] as String } } override fun getView(): View { return textView } override fun dispose() { TODO("Not yet implemented") } }
说明:
it["text"]为Flutter端参数text,获取到的值为Flutter传给AndroidTextView的参数
3.3 效果图
四 Flutter 向 Android View 发送消息 4.1 修改 Flutter 端,创建 MethodChannel 用于通信 1 2 3 4 5 6 7 8 9 10 11 12 13 14 15 16 17 18 19 20 21 22 23 24 25 26 27 28 29 30 31 32 33 34 35 void main() => runApp(PlatformViewDemo()); class PlatformViewDemo extends StatefulWidget { @override State<StatefulWidget> createState() => _PlatformViewDemoState(); } class _PlatformViewDemoState extends State<PlatformViewDemo> { static const platform = const MethodChannel('com.example.androidflutter.MyFlutterView'); @override Widget build(BuildContext context) { Widget? platformView() { if (defaultTargetPlatform == TargetPlatform.android) { return AndroidView( viewType: 'plugins.flutter.io/custom_platform_view', creationParams: {'text': 'Flutter传给AndroidTextView的参数'}, creationParamsCodec: StandardMessageCodec(), ); } } return MaterialApp( home: Scaffold( appBar: AppBar(title: Text("Flutter"),), body: Column(children: [ RaisedButton( child: Text('传递参数给原生View'), onPressed: () { platform.invokeMethod('setText', {'name': '张三', 'age': 18}); }, ), Expanded(child: Center(child: platformView(),)), ]), ), ); } }
说明:
MethodChannel('com.example.androidflutter.MyFlutterView'):为原生端MyFlutterView的全路径
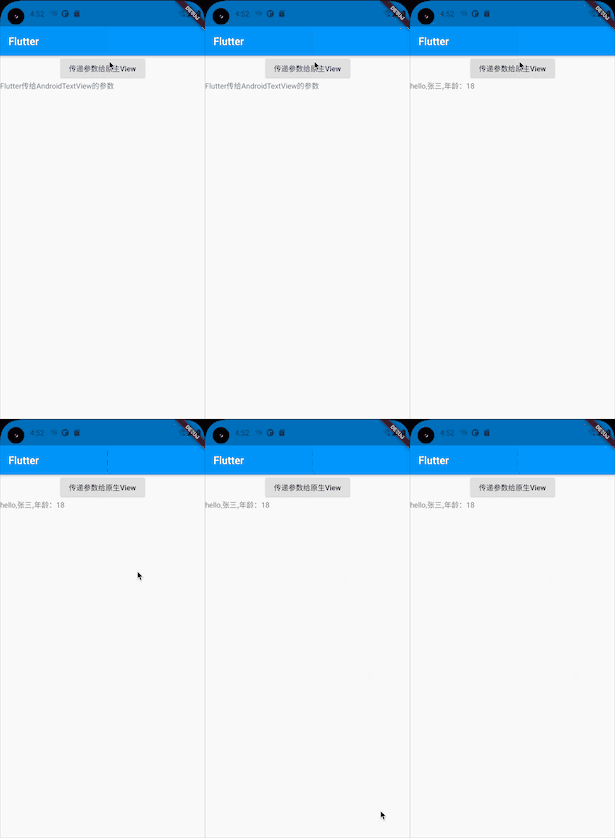
4.2 原生View 中也创建一个 MethodChannel 用于通信 1 2 3 4 5 6 7 8 9 10 11 12 13 14 15 16 17 18 19 20 21 22 23 24 25 26 27 28 29 30 31 32 33 class MyFlutterView(context: Context, messenger: BinaryMessenger, viewId: Int, args: Map<String, Any>?):PlatformView, MethodChannel.MethodCallHandler { val textView: TextView = TextView(context) private lateinit var methodChannel: MethodChannel init { args?.also { textView.text = it["text"] as String methodChannel = MethodChannel(messenger, "com.example.androidflutter.MyFlutterView") methodChannel.setMethodCallHandler(this) } } override fun getView(): View { return textView } override fun dispose() { methodChannel.setMethodCallHandler(null) } override fun onMethodCall(call: MethodCall, result: MethodChannel.Result) { if (call.method == "setText") { val name = call.argument("name") as String? val age = call.argument("age") as Int? textView.text = "hello,$name,年龄:$age" } else { result.notImplemented() } } }
说明:
MethodChannel(messenger, "com.example.androidflutter.MyFlutterView")为MyFlutterView的全路径,与Flutter端保持一致
4.3 效果图
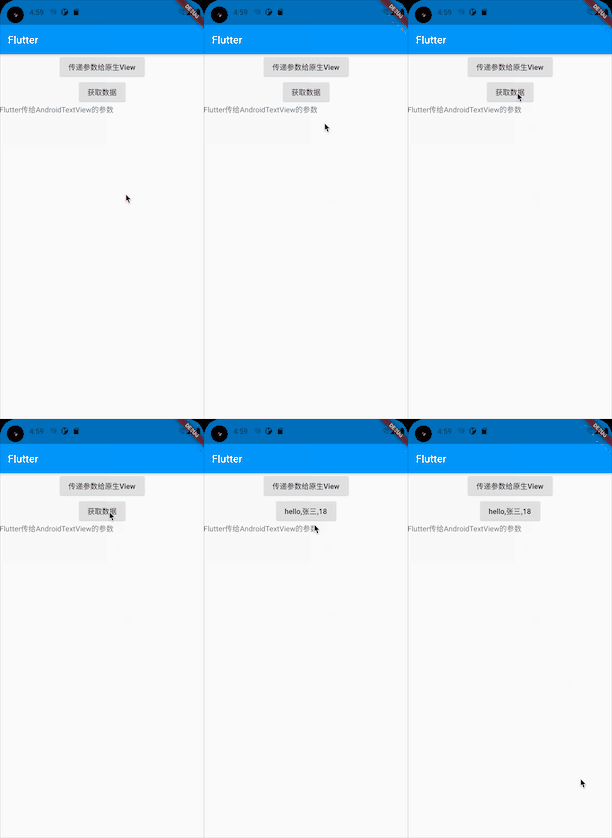
五 Flutter 向 Android View 获取消息 与上面发送信息不同的是,Flutter 向原生请求数据,原生返回数据到 Flutter 端
5.1 MyFlutterView onMethodCall 1 2 3 4 5 6 7 8 9 10 11 12 13 14 15 16 17 18 override fun onMethodCall(call: MethodCall, result: MethodChannel.Result) { if (call.method == "setText") { val name = call.argument("name") as String? val age = call.argument("age") as Int? textView.text = "hello,$name,年龄:$age" } else if (call.method == "getData") { val name = call.argument("name") as String? val age = call.argument("age") as Int? var map = mapOf("name" to "hello,$name", "age" to "$age" ) result.success(map) }else { result.notImplemented() } }
5.2 Flutter 端接收数据 1 2 3 4 5 6 7 8 9 10 11 12 13 var _data = '获取数据'; RaisedButton( child: Text('$_data'), onPressed: () async { var result = await platform .invokeMethod('getData', {'name': '张三', 'age': 18}); setState(() { _data = '${result['name']},${result['age']}'; }); }, ),
5.3 效果图


