一 概述
- Axios的基本用法并存在的问题
- 把axios挂载到Vue的原型上并配置请求根路径
- 把axios挂载到Vue原型上的缺点
二 Axios的基本用法并存在的问题
2.1 安装axios依赖
2.2 Axios执行网络请求代码
App.vue
1
2
3
4
5
6
7
8
9
10
11
12
13
14
15
16
17
18
19
20
21
22
23
24
25
26
27
28
29
| <template>
<div>
<h1>App跟组件</h1>
<hr>
<div class="box">
<Left></Left>
<Right></Right>
</div>
</div>
</template>
<script>
import Left from '@/components/Left.vue'
import Right from '@/components/Right.vue'
export default {
components: {
Left,
Right
}
}
</script>
<style lang="less" scoped>
.box {
display: flex;
}
</style>
|
Left.vue
1
2
3
4
5
6
7
8
9
10
11
12
13
14
15
16
17
18
19
20
21
22
23
24
25
26
| <template>
<div class="left-container">
<h3>Left组件</h3>
<button @click="getInfo">发起Get请求</button>
</div>
</template>
<script>
import axios from 'axios'
export default {
methods: {
async getInfo () {
const { data: res } = await axios.get('http://www.liulongbin.top:3006/api/get')
console.log(res)
}
}
}
</script>
<style lang="less" scoped>
.left-container {
background-color: orange;
min-height: 200px;
flex: 1;
}
</style>
|
Right.vue
1
2
3
4
5
6
7
8
9
10
11
12
13
14
15
16
17
18
19
20
21
22
23
24
25
26
| <template>
<div class="right-container">
<h3>Right组件</h3>
<button @click="postInfo">发起Post请求</button>
</div>
</template>
<script>
import axios from 'axios'
export default {
methods: {
async postInfo () {
const { data: res } = await axios.post('http://www.liulongbin.top:3006/api/post', { name: 'zs', age: 20 })
console.log(res)
}
}
}
</script>
<style lang="less" scoped>
.right-container {
background-color: skyblue;
min-height: 200px;
flex: 1;
}
</style>
|
2.3 界面效果及响应
2.4 存在的问题
- 每个组件(Left、Right)都需要导入axios,然后发起请求
- 发起请求的都是完整的路径地址
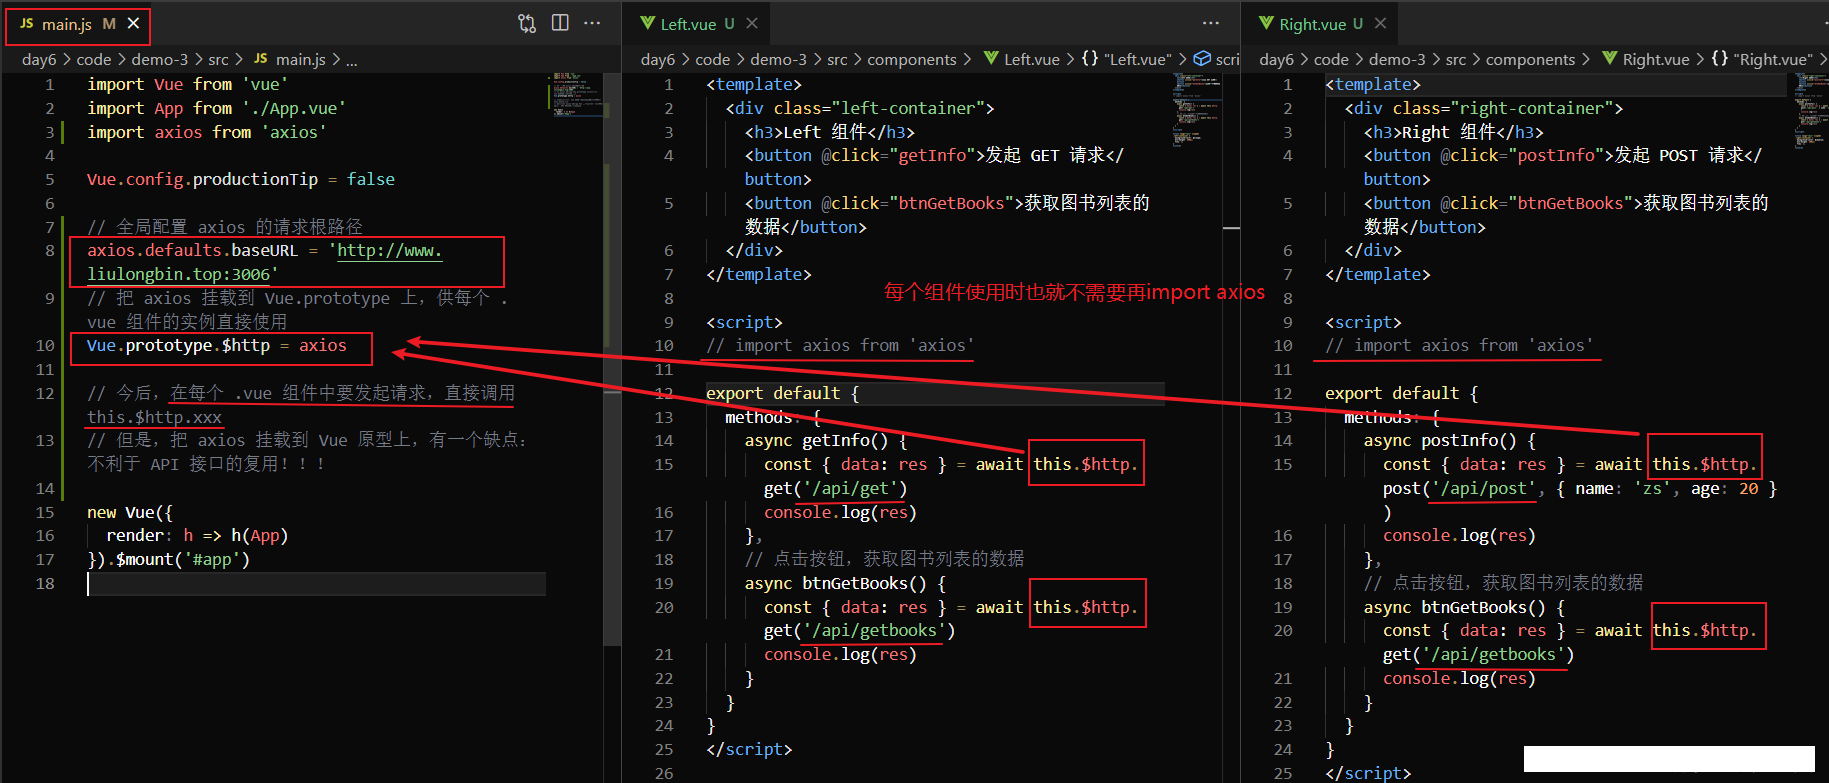
三 把axios挂载到Vue的原型上并配置请求根路径
3.1 将axios挂载到Vue中(main.js)
在main.js中添加一个变量到 Vue.prototype。这样 $appName 就在所有的 Vue 实例中可用了,甚至在实例被创建之前就可以
1
2
| import axios from 'axios'
Vue.prototype.$http = axios
|
3.2 使用Vue.prototype在每个Vue组件中发起请求
Left.vue
1
2
3
4
| async getInfo () {
const { data: res } = await this.$http.get('http://www.liulongbin.top:3006/api/get')
console.log(res)
}
|
Right.vue
1
2
3
4
| async postInfo () {
const { data: res } = await this.$http.post('http://www.liulongbin.top:3006/api/post', { name: 'zs', age: 20 })
console.log(res)
}
|
3.3 axios配置请求全路径
main.js中设置axios配置请求全路径
1
| axios.defaults.baseURL = 'http://www.liulongbin.top:3006'
|
Left.vue中请求简写
1
2
3
4
| async getInfo () {
const { data: res } = await this.$http.get('/api/get')
console.log(res)
}
|
Right.vue中请求简写
1
2
3
4
| async postInfo () {
const { data: res } = await this.$http.post('/api/post', { name: 'zs', age: 20 })
console.log(res)
}
|
四 把axios挂载到Vue原型上的缺点
在每个vue组件中要发起请求,直接调用this.$http.xxx,但是,把axios挂载到vue原型上,有一个缺点:不利于API接口的复用
五 参考
- CSDN—安装依赖时报错:npm ERR! code ERESOLVE npm
- CSDN—“Component name “XXX“ should always be multi-word
- CSDN—Vue中 Vue.prototype 详解及使用