一 概述
- Bootstrap下载
- npm安装bootstrap并使用(vue中使用)
- bootstrap通过本地lib导入并使用(html)
- bootstrap通过cdn导入并使用(html)
二 Bootstrap下载
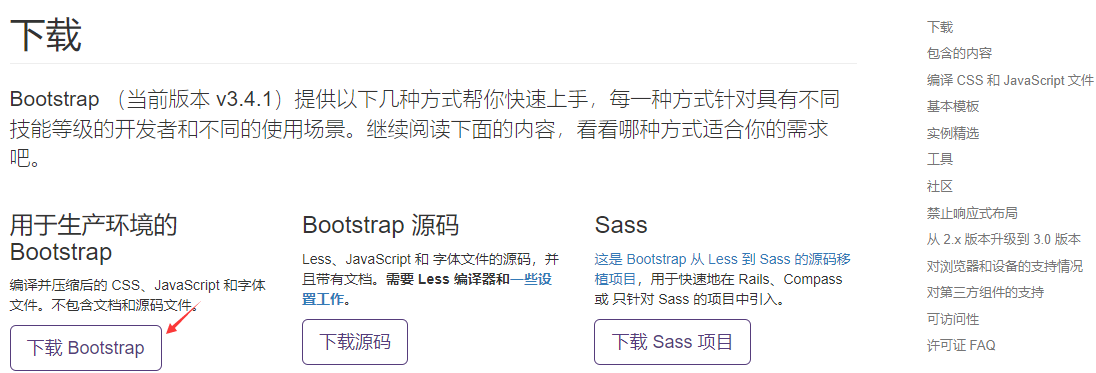
2.1 Bootstrap下载(v3.x版本为例)
在Bootstrap中文官网,点击顶部的入门标签,在如下图页面点击下载Bootstrap
2.2 下载解压后的目录结构
1
2
3
4
5
6
7
8
9
10
11
12
13
14
15
16
17
18
19
| bootstrap/
├── css/
│ ├── bootstrap.css
│ ├── bootstrap.css.map
│ ├── bootstrap.min.css
│ ├── bootstrap.min.css.map
│ ├── bootstrap-theme.css
│ ├── bootstrap-theme.css.map
│ ├── bootstrap-theme.min.css
│ └── bootstrap-theme.min.css.map
├── js/
│ ├── bootstrap.js
│ └── bootstrap.min.js
└── fonts/
├── glyphicons-halflings-regular.eot
├── glyphicons-halflings-regular.svg
├── glyphicons-halflings-regular.ttf
├── glyphicons-halflings-regular.woff
└── glyphicons-halflings-regular.woff2
|
三 npm安装bootstrap并使用(vue中使用)
3.1 创建vue项目
3.2 安装bootstrap依赖
1
2
| npm install jquery
npm install bootstrap
|
3.3 在HelloWorld.vue中使用bootstrap代码
1-导入依赖
1
2
3
4
5
6
| <script lang="ts">
import { Options, Vue } from "vue-class-component";
import "bootstrap/dist/css/bootstrap.min.css";
import "bootstrap/dist/js/bootstrap.min.js";
</script>
|
2-使用组件——>进度条示例代码
1
2
3
4
5
6
7
8
9
10
11
12
13
14
15
16
17
| <template>
<div class="hello">
<h1>{{ msg }}</h1>
<div class="progress">
<div
class="progress-bar"
role="progressbar"
aria-valuenow="60"
aria-valuemin="0"
aria-valuemax="100"
style="width: 60%"
>
<span class="sr-only">60% Complete</span>
</div>
</div>
</div>
</template>
|
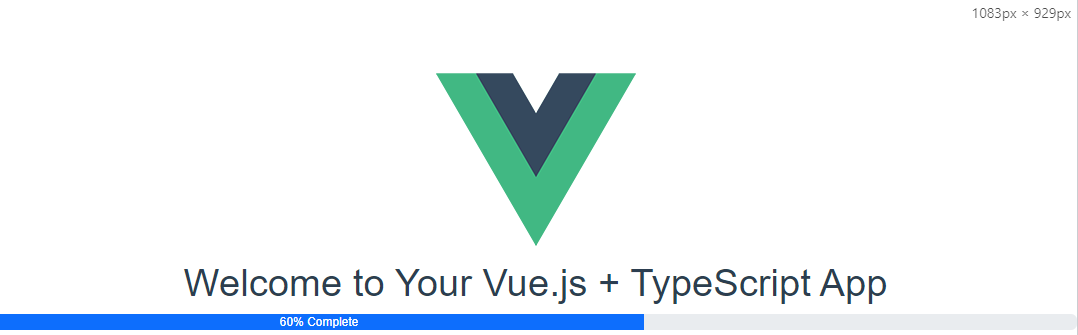
3.4 效果图
四 bootstrap通过本地lib导入并使用(html)
4.1 导入bootstrap依赖

4.2 bootstrap-demo.html添加lib依赖并使用组件
导入依赖
1
2
3
4
5
6
7
8
| <head>
<meta charset="UTF-8" />
<meta http-equiv="X-UA-Compatible" content="IE=edge" />
<meta name="viewport" content="width=device-width, initial-scale=1.0" />
<title>Document</title>
<link rel="stylesheet" href="libs/bootstrap-3.4.1-dist/css/bootstrap.min.css">
<script src="libs/bootstrap-3.4.1-dist/js/bootstrap.min.js"></script>
</head>
|
使用bootstrap组件
1
2
3
4
5
6
7
8
9
| <body>
<h1>Bootstrap示例</h1>
<hr/>
<div class="progress">
<div class="progress-bar" role="progressbar" aria-valuenow="60" aria-valuemin="0" aria-valuemax="100" style="width: 60%">
<span class="sr-only">60% Complete</span>
</div>
</div>
</body>
|
4.3 效果图

五 bootstrap通过cdn导入并使用(html)
5.1 bootstrap-demo使用cdn依赖并使用组件
导入cdn依赖
1
2
3
4
5
6
7
8
9
| <head>
<meta charset="UTF-8" />
<meta http-equiv="X-UA-Compatible" content="IE=edge" />
<meta name="viewport" content="width=device-width, initial-scale=1.0" />
<title>Document</title>
<link rel="stylesheet" href="https://cdn.staticfile.org/twitter-bootstrap/3.3.7/css/bootstrap.min.css">
<script src="https://cdn.staticfile.org/jquery/2.1.1/jquery.min.js"></script>
<script src="https://cdn.staticfile.org/twitter-bootstrap/3.3.7/js/bootstrap.min.js"></script>
</head>
|
使用依赖
1
2
3
4
5
6
7
8
9
| <body>
<h1>Bootstrap示例</h1>
<hr/>
<div class="progress">
<div class="progress-bar" role="progressbar" aria-valuenow="60" aria-valuemin="0" aria-valuemax="100" style="width: 60%">
<span class="sr-only">60% Complete</span>
</div>
</div>
</body>
|
5.2 效果图
六 参考
- Bootstrap入门
- Bootstrap-组件-进度条
- 菜鸟教程—Bootstrap