一 概述
- Angular项目目录介绍
- Angular程序如何启动
二 Angular项目目录介绍
2.1 项目目录
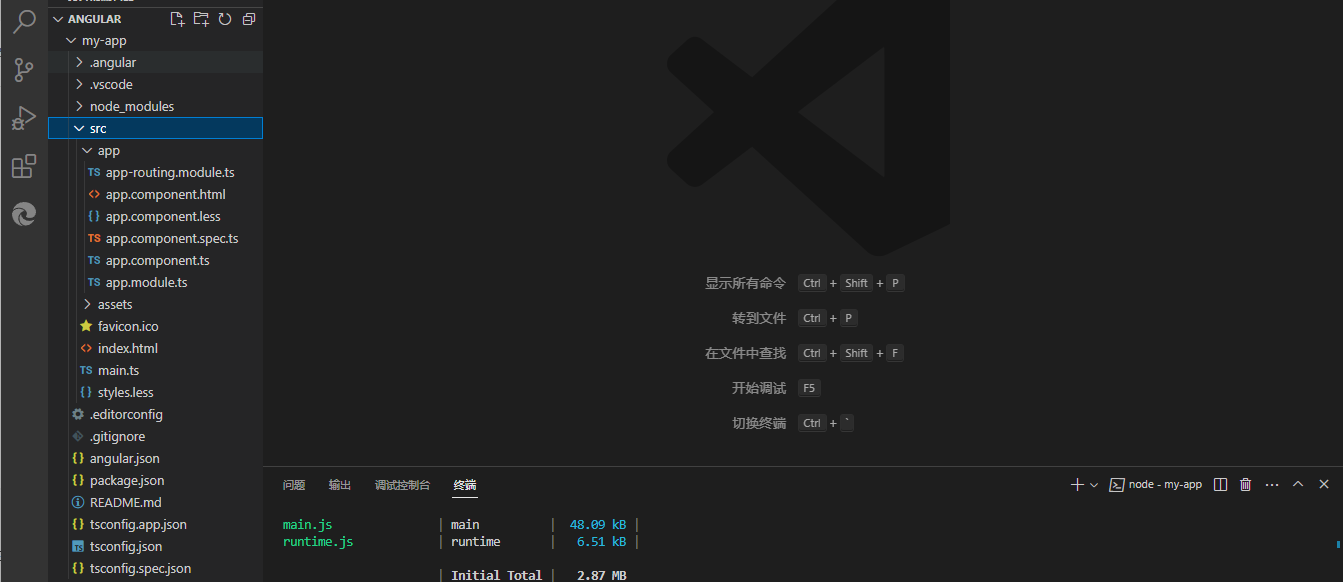
2.2 目录结构说明
工作区配置文件
- node_modules :第三方依赖包存放的目录
- src:应用源代码目录
- angular.json: Angular命令行工具的配置文件,后期可能会去修改它,引一些其他的第三方包,比如jquery
- package.json:这是一个标准的npm工具的配置文件,这个文件里面列出了该应用程序所使用的第三方依赖包。实际上我们在新项目的时候,等了半天就是在下载第三方依赖包。下载完成后会放在node_modules这个目录 中, 后期我们可能会修改这个文件
- README.md:说明文件
- tsconfig.app.json:TypeScript编译器的配置,添加第三方依赖的时候会修改这个文件
- tsconfig.json:文件中指定了用来编译这个项目的根文件和编译选项
- tsconfig.spec.json :测试库时用到的 TypeScript 配置
应用项目文件(src)
- app目录:包含应用的组件和模块,我们要写的代码都在这个目录当中
- assets目录:资源目录,存储静态资源,比如图片,css,js,等
- index.html:整个应用的根html,程序启动就是访问这个页面
- main.ts: 整个项目的入口点,Angular通过这个文件来启动项目
- styles.less:主要放一些全局的样式
组件配置文件(SRC/APP/ 文件)
- app/app.component.ts:为应用的根组件定义逻辑,名为
AppComponent
- app/app.component.html:定义与根组件
AppComponent 关联的 HTML 模板
- app/app.component.css:为根组件
AppComponent 定义了基本的 CSS 样式表
- app/app.component.spec.ts:为根组件
AppComponent 定义了一个单元测试
- app/app.module.ts:定义了名为
AppModule 的根模块,它会告诉 Angular 如何组装应用
- app/app-routing.module.ts:Angular路由模块
三 Angular程序如何启动
3.1 启动过程示意图
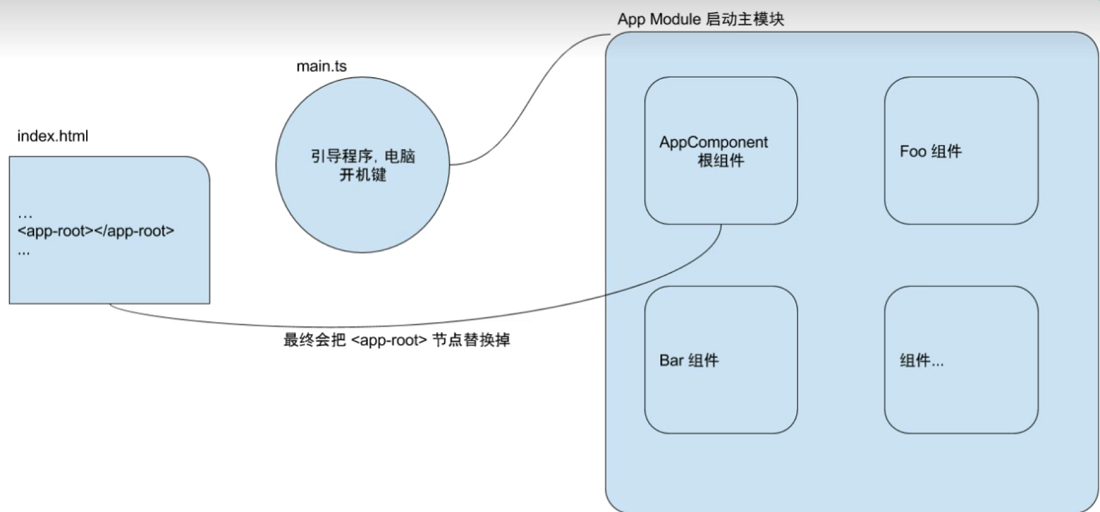
3.3 启动过程说明
1-Angular应用在启动时首先会去angular-cli.json这个配置文件中去寻找要加载的页面和脚本
1
2
3
4
5
6
7
8
9
10
11
12
13
14
15
16
17
18
19
20
21
| {
"$schema": "./node_modules/@angular/cli/lib/config/schema.json",
"version": 1,
"newProjectRoot": "projects",
"projects": {
"my-app": {
"projectType": "application",
"root": "",
"sourceRoot": "src",
"prefix": "app",
"architect": {
"build": {
"builder": "@angular-devkit/build-angular:browser",
"options": {
"outputPath": "dist/my-app",
"index": "src/index.html",
"main": "src/main.ts",
"tsConfig": "tsconfig.app.json",
},
}
}
|
说明:默认是加载index.html和main.ts
2-然后去main.ts中找到声明指定的主模块,默认的主模块是app.module
1
2
3
4
5
6
7
| import { platformBrowserDynamic } from '@angular/platform-browser-dynamic';
import { AppModule } from './app/app.module';
platformBrowserDynamic().bootstrapModule(AppModule)
.catch(err => console.error(err));
|
3-然后去app.module中找到指定的主组件,默认的主组件是app.component
1
2
3
4
5
6
7
8
9
10
11
12
13
14
15
16
17
18
| import { NgModule } from '@angular/core';
import { BrowserModule } from '@angular/platform-browser';
import { AppRoutingModule } from './app-routing.module';
import { AppComponent } from './app.component';
@NgModule({
declarations: [
AppComponent
],
imports: [
BrowserModule,
AppRoutingModule
],
providers: [],
bootstrap: [AppComponent]
})
export class AppModule { }
|
4-然后再去app.component中找到指定的选择器,模板和样式等等
1
2
3
4
5
6
7
8
9
10
| import { Component } from '@angular/core';
@Component({
selector: 'app-root',
templateUrl: './app.component.html',
styleUrls: ['./app.component.less']
})
export class AppComponent {
title = 'my-app';
}
|
5-最后,将组件渲染到index.html中的选择器中
1
2
3
4
5
6
| <!doctype html>
<html lang="en">
<body>
<app-root></app-root>
</body>
</html>
|
四 参考
- TypeScript-tsconfig.json
- Angular-TypeScript 配置
- Angular-工作区和项目结构
- CSDN-Angular的启动过程