IOS开发之——图层-基本使用(1)
一 概述
- UIView和CALayer的关系
- 如何通过操作CALayer对象,控制UIView的显示
二 概念
2.1 CALayer和UIView的关系
- CALayer负责视图中显示的内容和动画
- UIView负责监听和相应事件
2.2 CALayer
在IOS中,你能看得见摸得着的东西基本上都是UIView,比如一个按钮,一个文本标签,一个文本输入框,一个图标等等,这些都是UIView
其实,UIView之所以能显示在屏幕上,完全是因为它内部的一个图层
在创建UIView对象时,UIView内部会自动创建一个图层(即CALayer对象),通过UIView的layer属性可以访问这个层
1
@property(nonatomic,readonly,retain) CALayer *layer;
当UIView需要显示到屏幕上时,会调用drawRect方法进行绘图,并且会将所有内容绘制到自己的图层上,绘图完毕后,系统会将图层拷贝到屏幕上于是就完成了UIView的显示
换句话说,UIView本身不具备显示到功能,是它内部的层才有这个显示功能
2.3 CALayer的基本操作
- 通过操作CALayer对象,可以很方便地调整UIView的一些外观属性,比如:阴影,圆角大小,边框宽度和颜色
- 还可以通过给图层添加动画,来实现一些比较炫酷的效果
2.3 CALayer的属性
宽度和高度
1
@property CGRect bounds;
位置(默认指中点,具体有anchorPoint决定)
1
@property CGpoint position;
锚点(x,y的范围都是0-1),决定了position的含义
1
@property CGPoint anchorPoint;
背景颜色(CGColorRef类型)
1
@property CGColorRef backgroundColor;
形变属性
1
@property CATransform3D transform;
阴影颜色
1
@property CGColorRef shadowColor;
阴影不透明(0.0~1.0)
1
@property float shadowOpacity;
阴影偏移位置
1
@property CGSize shadowOffset;
三 示例
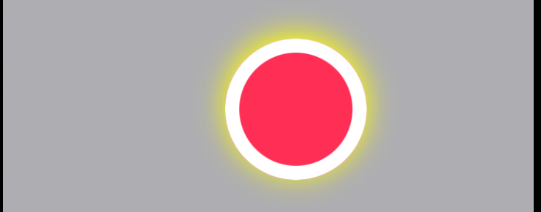
3.1 UIView示例
代码
1 | _redView.layer.shadowOpacity=1; |
效果图
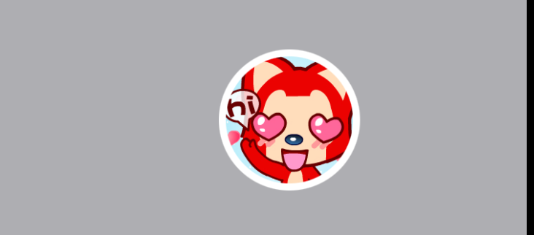
3.2 ImageView示例
代码
1 | _imageView.layer.cornerRadius=50; |
效果图
3.3 transform示例
代码
1 | - (void)touchesBegan:(NSSet<UITouch *> *)touches withEvent:(UIEvent *)event |
效果图
![]()